
Anchor Charts 101: Why and How to Use Them
Anchor charts 101 why and how to use them – Anchor charts 101: Why and How to Use Them – Have you ever walked into a classroom and seen colorful posters with key concepts and examples? These are anchor charts, and they are a powerful tool for educators looking to enhance learning and engagement.
They’re like visual roadmaps that guide students through complex topics, making them easier to understand and remember.
Imagine a classroom buzzing with activity, where students are actively participating in a lesson, referencing a vibrant anchor chart filled with examples and illustrations. That’s the power of anchor charts in action! They serve as visual reminders of important concepts, providing a shared understanding for both teachers and students.
What are Anchor Charts?
Anchor charts are visual representations of key concepts, vocabulary, or procedures that are created collaboratively with students during a lesson. They serve as a reference tool throughout the learning process, helping students to remember and apply what they have learned.
Types of Anchor Charts
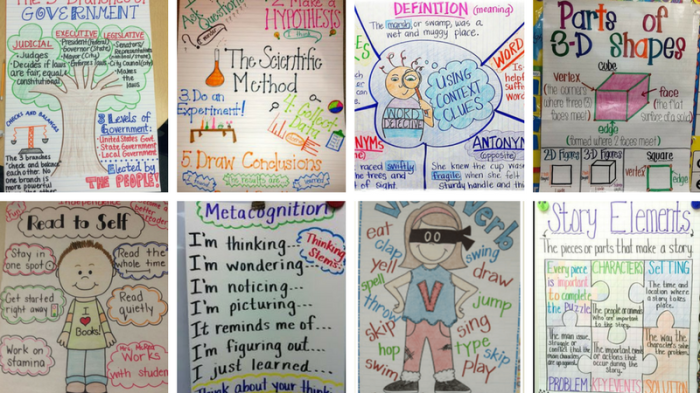
Anchor charts can be used in various subjects and for different purposes. Here are some examples:
- Math:An anchor chart for fractions might include a visual representation of different types of fractions, their definitions, and examples of how to solve fraction problems.
- Science:An anchor chart on the water cycle could depict the different stages of the cycle with illustrations and labels, along with a brief explanation of each stage.
- Reading:An anchor chart for reading comprehension strategies might include a list of strategies with brief descriptions and examples of how to use them.
- Writing:An anchor chart for persuasive writing could Artikel the different components of a persuasive essay, such as the introduction, body paragraphs, and conclusion.
Benefits of Using Anchor Charts
Anchor charts offer numerous benefits for both teachers and students. They:
- Provide a visual representation of key concepts:This makes learning more accessible and engaging for visual learners.
- Facilitate collaborative learning:Creating anchor charts together fosters a sense of shared responsibility and ownership of the learning process.
- Promote active engagement:Students are actively involved in the construction of the chart, which helps them to better understand and retain the information.
- Serve as a reference tool:Students can refer to the anchor chart throughout the lesson and beyond, reinforcing their learning.
- Support differentiated instruction:Anchor charts can be adapted to meet the needs of different learners, providing visual support for struggling students and challenging advanced learners.
Why Use Anchor Charts?
Anchor charts are visual representations of key concepts, vocabulary, and processes that can transform your classroom into a vibrant learning hub. They serve as a powerful tool for both teachers and students, fostering a deeper understanding of subject matter and promoting active engagement.
Anchor Charts Enhance Comprehension and Retention
Anchor charts act as visual aids that simplify complex information, making it more accessible to students. By breaking down concepts into manageable chunks and presenting them in a clear and concise manner, they enhance comprehension. The visual nature of anchor charts also aids in retention, as students can easily recall the information when they see the chart.
“The brain remembers things better when it has something to connect them to, and visual aids are an excellent way to create those connections.” Dr. Mary Helen Immordino-Yang, neuroscientist
Anchor Charts Foster Collaboration and Engagement
Anchor charts are not just teacher-created resources; they are collaborative tools that encourage active participation from students. When students contribute to the creation of an anchor chart, they become active learners, engaging with the content in a meaningful way. This collaborative process fosters a sense of ownership and responsibility, promoting a deeper understanding of the subject matter.
Anchor charts are a visual way to break down complex concepts and make learning more accessible. They can be used for everything from grammar rules to historical timelines, and even to track the progress of a team like the Pirates, who are reportedly looking to promote a promising infield prospect, as reported here.
Once you create a few anchor charts, you’ll see how they can be used in many different ways to help students learn and remember important information.
How to Create Effective Anchor Charts
Anchor charts are powerful visual tools that can enhance learning in various settings. Creating effective anchor charts involves a systematic approach that ensures clarity, engagement, and lasting impact.
Step-by-Step Guide for Creating Anchor Charts
Creating an anchor chart is a collaborative process that involves planning, designing, and refining. The following steps provide a structured approach:
- Identify the Learning Objective:Begin by clearly defining the learning objective that the anchor chart will support. This ensures focus and relevance. For example, if the objective is to understand the water cycle, the anchor chart should focus on key concepts and processes related to the water cycle.
- Choose a Format and Design:Consider the age and learning level of the audience when selecting the format and design of the anchor chart. For younger learners, use bright colors, simple illustrations, and large font sizes. For older learners, incorporate more complex visuals and text.
The design should be visually appealing and easy to understand.
- Gather Relevant Information:Collect relevant information, examples, and visuals that support the learning objective. Use a variety of sources, including textbooks, websites, and real-life experiences. Ensure the information is accurate, concise, and presented in a clear and engaging manner.
- Create a Draft:Sketch out a draft of the anchor chart on a large sheet of paper or whiteboard. Arrange the information in a logical sequence, using headings, subheadings, and bullet points to organize the content. Incorporate visuals, such as diagrams, illustrations, or photographs, to enhance understanding and engagement.
- Review and Revise:Once the draft is complete, review it for clarity, accuracy, and completeness. Seek feedback from colleagues or students to ensure the anchor chart is effective and meets the learning objective. Make necessary revisions to improve the overall design and content.
Anchor charts are visual tools that can help students learn and remember important information. They can be used for a variety of topics, from math and science to reading and writing. One great example of how anchor charts can be used is to help students understand complex concepts, like the one presented in this transcript of Deval Patrick on his vision for education.
By breaking down the information into smaller, more manageable chunks, anchor charts can help students to grasp the key points and make connections between different ideas.
- Finalize the Anchor Chart:After reviewing and revising, finalize the anchor chart by creating a clean and polished version. Use a variety of colors, fonts, and visuals to make the chart visually appealing and engaging. Ensure the chart is large enough to be seen by all students in the classroom.
Types of Anchor Charts and Their Purposes
Anchor charts can be tailored to different learning needs and purposes. Here are some common types of anchor charts and their corresponding applications:
| Type of Anchor Chart | Purpose |
|---|---|
| Concept Map | Visual representation of relationships between concepts, ideas, or terms. |
| Word Wall | Collection of words related to a specific topic or theme. |
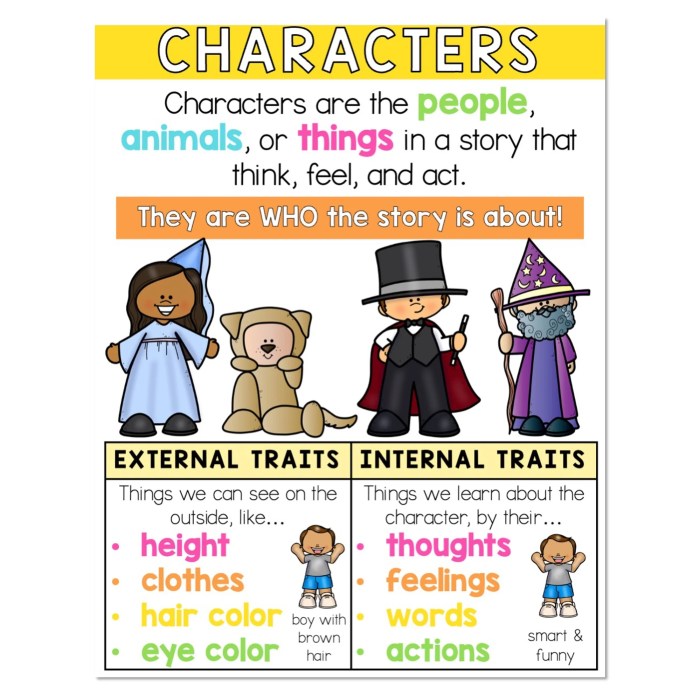
| Story Map | Graphical representation of the key elements of a story, such as characters, setting, plot, and theme. |
| Problem-Solving Chart | Step-by-step guide for solving problems or completing tasks. |
| Graphic Organizer | Visual structure for organizing information, such as brainstorming ideas, outlining essays, or summarizing text. |
Visual Elements for Anchor Charts
Visual elements play a crucial role in making anchor charts engaging and effective. Here are some examples of visual elements that can be incorporated:
- Illustrations:Hand-drawn or computer-generated illustrations can add visual interest and help students understand complex concepts.
- Photographs:Real-life photographs can provide context and make the anchor chart more relatable.
- Diagrams:Diagrams can be used to represent relationships, processes, or systems.
- Symbols:Symbols can be used to represent concepts, ideas, or key terms.
- Color:Color can be used to highlight important information, create visual interest, and make the chart more appealing.
Integrating Anchor Charts into Lesson Plans

Anchor charts are a valuable tool for teachers, offering a visual representation of key concepts and skills. Integrating them seamlessly into lesson plans ensures that they serve as a constant point of reference and support student learning throughout the entire lesson.
Using Anchor Charts for Concept Introduction
Anchor charts can be effectively used to introduce new concepts to students. By creating a visual representation of the concept, teachers can engage students and provide them with a framework for understanding.
- Example:When introducing the concept of fractions, teachers can create an anchor chart with different representations of fractions, such as pictures, number lines, and word problems. This visual aid helps students understand the different ways fractions can be expressed and the relationship between the numerator and denominator.
Anchor charts are a powerful tool for visual learners, providing a quick reference point for key information. They can be used for anything from summarizing a chapter in a textbook to breaking down the steps of a complex process. I find them especially helpful when trying to process all the information from a chaotic week in the NFL, like the one we just had, where everyone’s making bold pronouncements after just two games.
For example, the article nfl week 2 knee jerk reactions bryce young era needs to end bucs are for real is a perfect example of how to use an anchor chart to organize the week’s events and keep track of all the hot takes! Ultimately, the key to using anchor charts effectively is to tailor them to your specific needs and make them visually appealing and engaging.
Using Anchor Charts for Concept Development
Anchor charts are not only helpful for introducing concepts but also for developing them further. By adding new information and examples to the chart as the lesson progresses, teachers can guide students in building a deeper understanding of the concept.
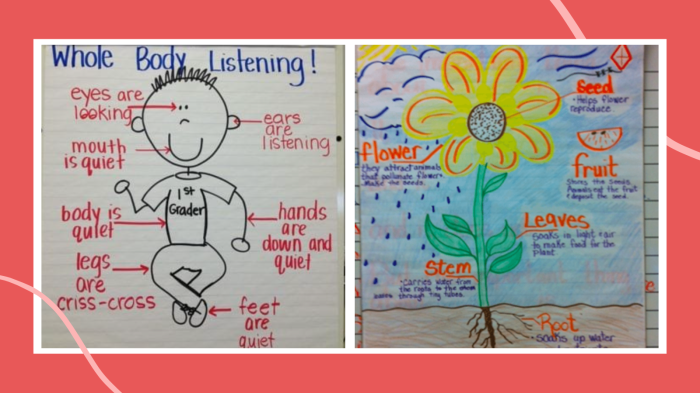
- Example:During a lesson on plant growth, teachers can start with a basic anchor chart outlining the essential parts of a plant. As the lesson progresses, they can add information about the functions of each part, the process of photosynthesis, and the different stages of plant growth.
This ongoing development of the anchor chart helps students visualize the interconnectedness of different concepts and provides them with a comprehensive overview of the topic.
Using Anchor Charts for Concept Review
Anchor charts serve as excellent review tools, allowing students to revisit and reinforce previously learned concepts. By referring to the chart, students can quickly access key information and identify areas where they need further clarification.
- Example:After completing a unit on the solar system, teachers can use the anchor chart created during the unit to review the names and characteristics of different planets, the order of planets in the solar system, and the differences between planets and stars.
This helps students consolidate their learning and identify any areas where they need further practice.
Creating Interactive Anchor Charts
Interactive anchor charts encourage student participation and make learning more engaging. By involving students in the creation and modification of the charts, teachers can foster a sense of ownership and promote active learning.
- Example:When studying different types of animals, teachers can ask students to contribute to the anchor chart by drawing pictures of their favorite animals, writing their names, or adding information about their habitats. This interactive approach allows students to actively participate in the learning process and makes the chart more meaningful to them.
Integrating Anchor Charts into Different Lesson Components
Anchor charts can be integrated into various components of a lesson, including:
- Introduction:Use an anchor chart to introduce the topic, activate prior knowledge, and set the stage for the lesson.
- Direct Instruction:Use an anchor chart to model the concept, explain key terms, and provide examples.
- Guided Practice:Use an anchor chart to support students as they practice the concept with teacher guidance.
- Independent Practice:Use an anchor chart as a reference tool for students to complete independent work.
- Assessment:Use an anchor chart to assess student understanding through questions, discussions, or activities.
Utilizing Anchor Charts for Different Learning Styles: Anchor Charts 101 Why And How To Use Them
Anchor charts are powerful tools for engaging students in learning and can be adapted to cater to diverse learning styles. By incorporating visual, auditory, and kinesthetic elements, teachers can create anchor charts that appeal to a wider range of learners.
Creating Anchor Charts for Visual Learners
Visual learners thrive on seeing information presented in a clear and organized manner. Anchor charts can effectively meet this need by:
- Using bright colors, bold fonts, and eye-catching graphics to make information visually appealing.
- Employing diagrams, illustrations, and maps to represent concepts visually.
- Utilizing graphic organizers like mind maps, flowcharts, and Venn diagrams to structure information.
For instance, an anchor chart on the water cycle could include a colorful diagram showing the different stages of the cycle, with arrows indicating the movement of water.
Creating Anchor Charts for Auditory Learners
Auditory learners learn best by hearing information. To cater to this learning style, anchor charts can:
- Include rhyming phrases, catchy slogans, or songs related to the topic.
- Incorporate audio recordings of key concepts or vocabulary words.
- Provide space for students to record their own audio notes or summaries.
An anchor chart on animal adaptations could include a catchy rhyme about different animal features and their functions.
Creating Anchor Charts for Kinesthetic Learners
Kinesthetic learners learn by doing and experiencing. Anchor charts can be adapted for kinesthetic learners by:
- Incorporating interactive elements, such as pockets for students to place objects or manipulatives.
- Encouraging students to physically move around the chart and interact with its elements.
- Providing opportunities for students to create their own anchor chart components.
For example, an anchor chart on fractions could include a set of fraction circles that students can manipulate to understand different fraction concepts.
Differentiating Anchor Charts for Students with Varying Needs
Anchor charts can be easily differentiated to meet the needs of students with varying learning abilities.
- For students who need additional support, anchor charts can be simplified by using fewer words and more visuals.
- For advanced learners, anchor charts can be extended by adding more complex information or challenging questions.
- For students with visual impairments, anchor charts can be adapted using tactile elements or large print.
- For students with auditory processing difficulties, anchor charts can be presented in a way that minimizes auditory distractions.
By incorporating these strategies, teachers can ensure that anchor charts are accessible and engaging for all students.
Evaluating the Effectiveness of Anchor Charts
The effectiveness of anchor charts in the classroom is crucial to their success as a teaching tool. Regularly assessing their impact on student learning and engagement is essential to ensure they remain relevant and beneficial.
Evaluating anchor charts involves a multi-faceted approach that considers student understanding, engagement, and the overall impact on learning outcomes. By analyzing these factors, teachers can determine whether anchor charts are serving their intended purpose and make adjustments to improve their effectiveness.
Gathering Feedback from Students, Anchor charts 101 why and how to use them
Gathering feedback from students is a vital component of evaluating anchor charts. It provides valuable insights into their understanding and engagement with the information presented.
Here are some strategies for gathering feedback:
- Direct Observation:Teachers can observe students as they interact with anchor charts, noting their engagement, participation, and understanding. Look for signs of active listening, questioning, and application of the information.
- Informal Discussions:Engage students in informal discussions about the anchor chart, asking questions about what they learned, what was confusing, and how the information could be applied.
- Student Reflections:Encourage students to reflect on their learning by writing about their experiences with the anchor chart. This can be done through journal entries, exit tickets, or short essays.
- Peer Feedback:Encourage students to share their understanding with peers and provide feedback on each other’s learning. This can be done through group discussions, peer reviews, or collaborative projects.
Modifying Anchor Charts Based on Feedback
Student feedback is invaluable for refining and improving anchor charts. Analyzing feedback can help identify areas where the chart is not effective and suggest ways to improve it.
Here are some strategies for modifying anchor charts based on student feedback:
- Clarify Confusing Information:If students express confusion about certain information, revise the anchor chart to provide clearer explanations, additional examples, or visual representations.
- Add More Details:If students feel the anchor chart lacks depth, add more information, examples, or connections to real-world applications. This can make the information more engaging and relevant to their lives.
- Simplify Complex Information:If students struggle to understand complex information, simplify the language, use visuals, or break down the information into smaller, more manageable chunks.
- Adjust the Layout:If the layout of the anchor chart is distracting or confusing, make adjustments to improve its organization and readability. This may involve changing the font size, color scheme, or arrangement of information.